

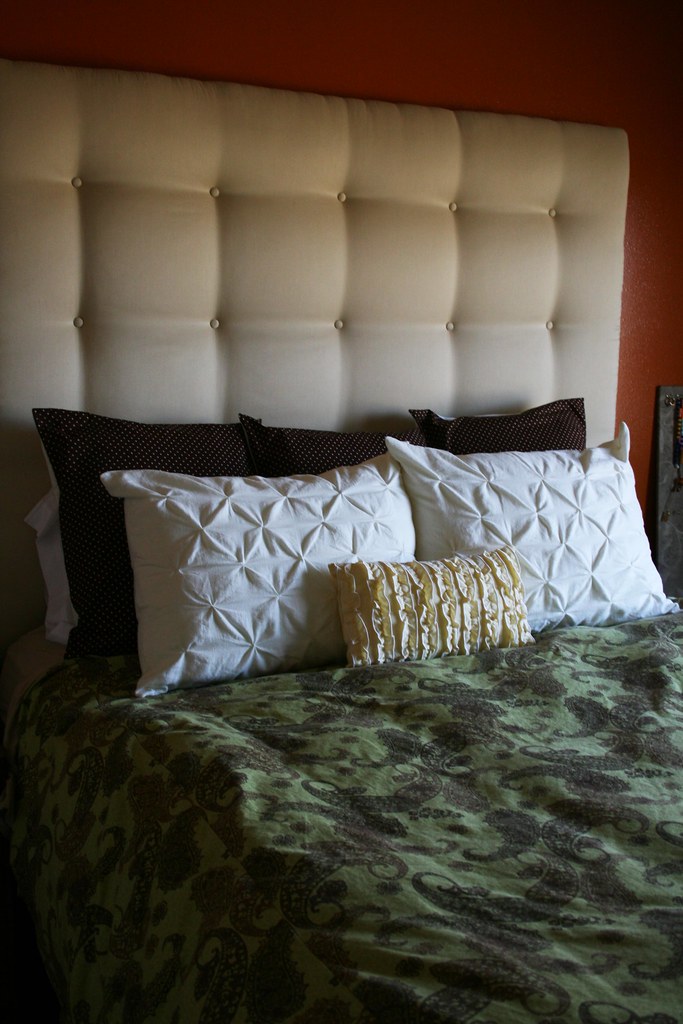
Alright folks, I'm finally bunkering down and giving the tutorial on how to make a padded, tufted, headboard. Anyone can do this if they have a DRILL, and a STAPLE GUN. Here we go!
Supplies for a Queen Size Headboard:
2 yards of fabric
cover buttons
upholstery thread
lots of thick batting, yardage depends on how thick you want it- OR- at Fred Meyers they sell thick foam for $20/piece and you will need 2 of them for a queen size (unless you don't want it tall like mine)
4x8 board from Lowes or Home Depot- I usually get 3/4" thick
2x4
Step 1: Measure how wide you want your headboard. I did mine a few inches wider on each side of my bed. Draw a line, and cut it!
Step 2: Lay out your buttons, and decide where you want them. Do you want them staggered? Lined up exactly? Each look can look good, but is different! After you have an idea of where you want them, measure carefully and mark the spots with a permanent marker- I'd suggest drawing a BIG dot so it stands out.
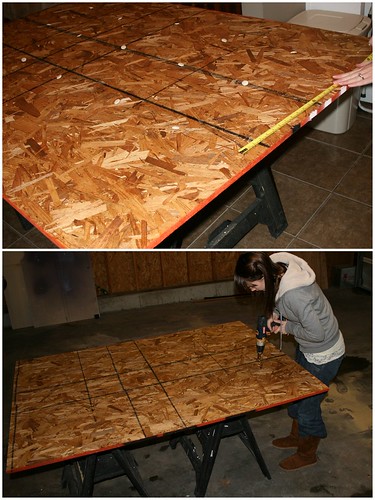 Step 3: Drill holes in the spots you just marked. This part is pretty dang fun actually:) One of my favorite parts! I would suggest using a fairly large bit...maybe about half an inch, because it will come in handy for the following steps.
Step 4: Put the legs on. We did this by drilling a hole through the board, and legs (which were made by cutting a 2x4 in half) and then screwing in screws:)
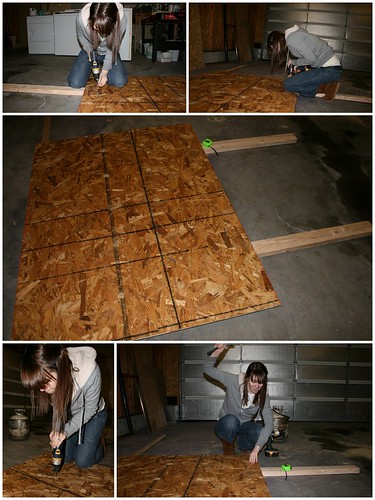 Note: When we made another headboard later, we put the legs on LAST- after the headboard was all put together. I would suggest this. Just make sure you get long enough screws to go through the 2x4 and the board, but short enough that they don't poke through too far. It's okay if they do a little bit because the foam usually protects ya!
Step 5: Lay your foam/batting on the ground, and then lay your board ontop of it. Staple all around the foam to keep it in place.
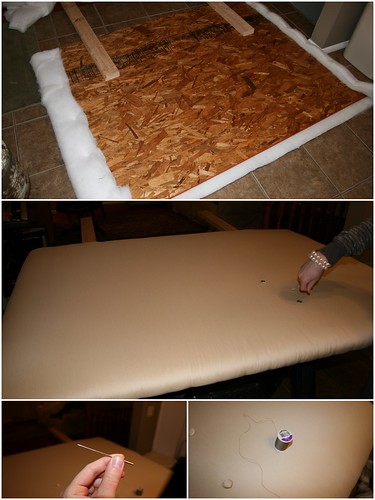 Step 6: Do the same with the fabric. Lay it right side down on the floor, then put your board ontop of it. Pull the fabric tight around the board and staple it.
Step 7: Prop your headboard on something that will hold it in the air. Take your super long needle, and wrap your upholstery thread around it. We quadrupled the thread...to make it super strong. Next you go from the back of the headboard (the exposed wood part) and poke your needle through one of the holes you made. It will then poke out of the fabric, where you then thread the covered button through (to cover your buttons, read instructions on package!), then poke back up through the fabric. This is where the bigger bit can come in handy when drilling holes, because it can be tough to find that hole again!
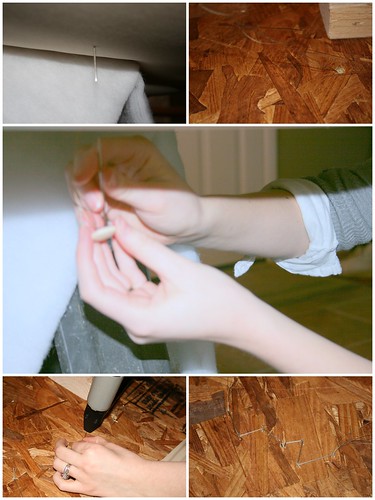 Then you pull as TIGHT as you can on both ends of the thread, and staple in a kind of zig-zag fashion. This holds it tight.
Continue this step with all the holes, and WALLAH! You are done! Put that bad boy up behind your bed, and you will just feel so happy:)
5 comments:
this is so cool! i hope I get to make one some day-
i saw your ruffle tote- it is so cute!!!!!!! i love it.
Wow. That is awesome. Really really cool. I want to make one. It's beautiful and your instructions were great.
That sounds so simple. It probably isn't easy, but simple. At least with your instructions. :)
Hi guys,
My name is Jules and I am from Stirling in the United Kingdom. I have not long ago discovered this forum and I like it alot.
I am a little bit shy so I wont talk much about me but maybe when I will get confortable, you guys will get to know me better!
My main hobbies are astrology and watching movies. I also like outdoor activites but the temperature has been bad for the last weeks or so here in Stirling.
I was wondering if anyone else here is from the united Kingdom too?
I am glad to be a member here at danielleandclayton.blogspot.com now!
Have a nice day!
:)
Jules
PS: Sorry if this was posted in the wrong section. I could not find the right one!
Good post and this mail helped me alot in my college assignement. Say thank you you for your information.
Post a Comment